How to make butter from cow's milk. How to make butter at home? Making butter at home with a mixer
Please advise how you can make good butter at home? Do you need to add something to it?
At first, I also could not make good homemade butter, although my cow gave very fatty milk. Having studied many books describing the technology of making butter, I developed my own, which is most suitable for use at home.
After milking the cow, I filter the milk through 4 layers of gauze and put it to rest for about two days. Occasionally I ferment milk, and then sour cream can be removed after five hours. If I take off the top from one bucket, then I immediately put it in a churn and beat it down. If a couple of buckets of milk have accumulated, then I interfere with the sour cream removed from them and certainly let it ripen for 3-4 hours.
I put the ripened sour cream in a bucket of warm water so that it warms up in it to 110 (no less!). And when I'm in a hurry, I do it even easier: I pour a glass of warm water into the removed mixture and into the churn.
Before creating a whole piece, it is not necessary to churn, because in this case the oil will not be washed out, there will be impurities in it. The process must be completed when only grains of fat appear. That's when I start washing.
Each grain of oil is perfectly rinsed and freed from whey. How do they do it? Having drained the whey from the churn, I fill it with water at room temperature and again grind the grains. Subsequently, I change the water again and beat the butter again. After washing it in two waters, I select the fat with a slotted spoon on a plate and squeeze it with a lid from the churn. And since the oil was in grains, it is perfectly pressed and molded, it becomes solid. After these manipulations, I take it out to the cold.
Homemade butter great to keep in a dark place, in slightly salted well water. But it is important that it be completely immersed in water. The oil can lie in it for 20 days, but the water must be changed periodically. You can, of course, keep it in the refrigerator, but there it comes into contact with air, which is why it decomposes more quickly.
In summer, the oil comes out rich, beautiful yellow. This is because there is a lot of carotene (vitamin A) in summer feeds, which gives the oil a bright yellow color. Winter product - light, which means a low content of carotene.
Homemade cream butter
I also make homemade butter from cream. After removing them from milk (I don’t have a separator), I’ll let them stand for 3 hours and start churning. Further all the same. In this case, it is necessary to churn for a longer period of time than when using sour cream, but the oil comes out sweeter.
A very fragrant oil is obtained from melted sour cream - like Vologda - with a nutty smell. Ordinary sour cream is put in the oven and stands until browned. Subsequently, it is cooled and laid out in a butter churn.
For longer storage, you can cook salted butter. In this case, one must remember a simple rule: add salt in an amount of 2% of the volume and in the process of churning, and not after the oil has been produced.
Butter comes out great melted butter. I spread a piece in an enamel pan without water. When boiling, I remove the foam, and in order for non-fat impurities to settle better, I sprinkle with a little salt. After about 30 minutes of light simmering, scoop out the top with a spoon or allow to set, then separate the yellow portion of pure ghee from the bottom whitish sediment.
You won’t get good butter if you feed slop to a cow instead of grain fodder. I want to make a warning about some feeds. From feeding a cow fodder grain, peas, the butter from her milk will crumble. There is also no need to get involved in compound feed.
Churn
And now about how to make a butter churn. This elementary device has been serving me for several years now.
For the production of a butter churn, you can use any significant container (only non-aluminum): a jar, a can or a tank. For example, I adapted a five-liter glass jar for this. The lid of my butter churn consists of two boards. The lower plank is tightly embedded in the neck, the upper one covers the edges from above, for this reason it is 2 cm wider. The boards are connected with screws.
A hole with a diameter of about 8 millimeters is drilled in the middle of the cover to insert a rod - a wooden stick. A recess is made around this hole in the upper plate so that the sour cream taken out of the can does not spread during the churning process, but flows back into the can. The stem freely penetrates into the opening of the cover. The diameter of this stick is one and a half millimeters less than the diameter of the hole.
At the bottom, the rod ends with a wooden cross with planks at both ends, so that the cross is tightly pressed against the bottom of the can.
If the neck of the container is wide enough, the crosspiece can be fixed tightly on the stem, and if it is narrow, it is best to make a collapsible one and use a piece of fabric for greater connection strength when assembling inside the container.
I fill the jar with sour cream for 1/3. Up to 800 grams of butter can be cooked in it at a time. I shoot 20-30 min. After the container is filled, I lower the stem with the cross inside, firmly press the lid into the neck and, lifting the stem up and down, churn the oil. Here is such a technology.
step by step recipe with photoButter is neither an independent food product nor a separate dish. Meanwhile, without it it is difficult to imagine a modern kitchen, especially for children. The high calorie content of high-quality oil is leveled by a high degree of assimilation. For cooking at home, you will need only the freshest raw materials of the highest quality.
Whipping cream is a way to reduce the content of the latter in a mixture of fat and water. The whey that separates is used for baking. It should be remembered that a product made by hand has a short shelf life.
Ingredients
You will need for 250 g of butter: 
- 300-500 g homemade cream
Cooking
 1. The difference in grams of homemade cream is due to the fact that sometimes you can buy dense, thick cream, and sometimes liquid. But do not confuse them with a store-bought product - cream from a supermarket is only good to add to coffee. To create butter, you need a homemade dairy product with a fat content much higher than 33%! They can be found in the markets. Transfer the cream into the bowl of a food processor or into a deep container if you plan to whip it with a mixer.
 2. Add salt immediately to help separate the buttermilk from the whey.
 3. Start whipping at the highest speed of the technique. For heavy cream, 10-15 minutes is enough and the volume of buttermilk released will be 1-2 tbsp. l., but for liquid cream, the whipping time will increase significantly and will be about 25-30 minutes. At the same time, you will need to drain the buttermilk that stands out from time to time (do not pour it out - pancakes and pancakes baked with such whey turn out to be incredibly tasty)!
 4. Put the finished whipped butter into a prepared container, which can be easily broken or removed after freezing. Then place in the freezer for 1 hour.
 5. After the butter has set, remove the container and transfer the layer of whipped homemade product to parchment paper or to a storage bag. Wrap it up and tie it, and then place it in the refrigerator. In this way, you can prepare a larger amount of oil, but remember that you need to store it in a freezer in a separate compartment if you do not plan to taste it right away, as it absorbs various aromas very strongly.
 Add butter, the recipe for which you already know, to any side dish or simply spread on bread or toast.
Note to the owner
1. Probably all housewives tried to use whey as the basis of pancakes, but few use its full potential in other areas of cooking and in cosmetology - at home, of course. Buttermilk with pomegranate, tomato or citrus juice will be an excellent marinade for meat that is too tough. Supporters of low-calorie breakfasts fill her with corn flakes and muesli. In tandem with crushed rhubarb pulp or grated pickled cucumber, it turns into a mask for blackheads and similar oily skin problems. And there are so many recipes for serum hair balms that there is, perhaps, for every occasion and any type of hair.
2. If hot buttermilk is poured over cottage cheese, excess acid will leave it.
3. It is advisable to freeze the finished oil not in one large piece, but in several - about a hundred grams; if the family is large - with bars of a slightly larger size, 200 grams each, like standard store packs. Therefore, it is better to lay it out for solidification in several separate molds. The best would be silicone, designed for baking muffins. The foil wrapper will protect the product from absorbing foreign odors.
4. From a mixture of cream removed from goat's and cow's milk (1: 4), butter is also made. Just such a proportion is recommended so that the fat content corresponds to GOST - about 72%.
Do-it-yourself butter is not as scary as you thought.
To make butter at home, you will need cow cream (collected with a separator) or sour cream (also called "collected cream" or "collected sour cream" in the markets). From separatory cream you get sweet cream butter, from sour cream - sour cream. Both will be delicious and suitable for both baking and making ghee (aka Ayurvedic ghee) or brown butter.
There are only two ingredients - cream or sour cream.
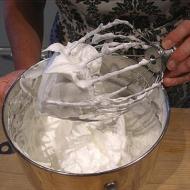
If you have a planetary mixer, put cream or sour cream in it, put on the mixing attachment. If there is no mixer, then put everything in a deeper bowl and take a regular hand mixer (you can also use an immersion blender, but with a whisk attachment).
Next, I wrap the mixer with cling film, because in the process of whipping, liquid begins to separate from the cream (it is called "buttermilk" or "butter"), and the mixer begins to spray it around the kitchen. If you beat with a conventional mixer, then as soon as you see that liquid has appeared, reduce the speed.
Photo: lovekitchen.me
As soon as the fat (this is the oil) starts to stick to the mixer nozzle or whisk, turn it off. After that, take a sieve, put it in a bowl or pan, and drop the oil on it along with the buttermilk - the latter can be poured into a jar and put in the refrigerator. By itself, it is very useful. I know that some people even drink it, but I prefer to cook pancakes on it or use it for rich pastries.
 Photo: lovekitchen.me
Next, you need to rinse the oil well (if you do not plan to store it for more than a few days, you can not rinse it). To do this, place a sieve with oil under a stream of cold water as much as possible, rinse well, helping with your hands. Rinse until the water that passes through the oil is completely clear. Collect all the oil in one piece, squeezing as much as possible with your hands.
 Photo: lovekitchen.me
Now you need to remove the remaining excess liquid from the oil and give it a shape. To do this, divide it into the number of parts you need. Then you take one such part, place it in a clean, cold jar (I put the jar in the refrigerator beforehand), take it in your hands, and start shaking it - up and down or away from you and towards you - so that your oil beats against the walls. Excess liquid will begin to come out of it, and the surface will become smooth. Do this until absolutely all the liquid comes out of the oil. You take out the oil from the jar - it is ready.
 Photo: lovekitchen.me
Then you can use it for its intended purpose, or simply wrap each piece in parchment paper. Already in paper, with a rolling pin, you can beat it off a little, giving it a more convenient rectangle shape for storage.
From 1 liter of skimming cream, I get 700 g of butter. From sour cream is usually a little less. I also want to say that butter of different colors can be obtained from cream or from different cows - from light creamy to bright yellow.
 Photo: lovekitchen.me
If you do everything right, your butter will not crumble when cut, it will be exactly like in the photo below. You can store it in the refrigerator, and if you cook a lot at once, then it is better to leave in the refrigerator only what you are going to use in the near future, send the rest to the freezer.
 Photo: lovekitchen.me
There is an easier way to remove excess fluid. After washing, place the oil in a sieve or colander, after lining it with a linen or cotton cloth, wring it out well, put something heavy on top and leave it for a while.
Thus, the excess liquid will go away on its own, but the oil will crumble very much when cut. Yes, and it is inconvenient to store it in such a large piece. Therefore, I recommend using this method only if you need the oil exclusively for making ghee or brown butter, and also if you will use it immediately in baking.
 Photo: lovekitchen.me
And about how to cook delicious butter from stewed cream, exactly the one that is great to spread on bread, how to cook salty and all kinds of flavored butter from it, and how to heat the butter that I cooked today (or cook ghee butter) in the oven - I'll show you another time.
Come to the TSN group. Blogs on
It can be bought at any store. But in terms of taste and quality, the purchased product is very different from the analogue prepared by oneself. After reading this publication, you will learn how to make butter at home.
A few words about the useful properties of this product
The raw materials used for self-preparation of homemade butter are rich in phosphorus, carbohydrates, proteins, as well as vitamins A and D. All these substances must be present in the menu of people diagnosed with diseases of the gastrointestinal tract, including gastritis and ulcers . Milk fat, which forms the basis of butter, is well absorbed by the human body.
Regular use of this product has a beneficial effect on the condition of the skin, hair, bone and muscle system. For those who do not know how to make butter at home, it will certainly be interesting to know that the lecithin contained in it helps to normalize the balance of cholesterol. Of particular benefit will be a product prepared in the summer. This is due to the fact that during this period the basis of the cow's diet is not hay, but the freshest meadow vegetation.

How to make butter at home from sour cream?
To do this, you will need chilled raw milk and a mixer or food processor. From one liter of not very thick sour cream, about 450 grams of butter will be obtained.
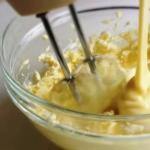
First you need to pour the sour cream into a container in which it will subsequently be whipped, and send it to the refrigerator. After a couple of hours, you can start the cooking process. This should be done with a mixer running at medium speed. As you whip the butter, you should gradually slow down. Otherwise, the whole kitchen will be in oil splashes.
After crumbs appear in the bowl, floating in a whitish liquid, you can turn off the mixer. The finished oil is thrown into a colander and, after the buttermilk has completely drained, it is washed in a container filled with ice water. Balls are formed from the resulting product, wrapped in cling film and placed in the freezer.

How to make butter at home from milk?
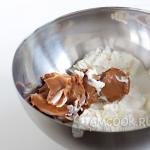
For these purposes, it is advisable to take not a store, but a natural farm product. And the fatter it is, the better. A jar of such milk is sent to the refrigerator. After 10-12 hours, a layer of cream forms under the lid. It must be collected with a perforated spoon used to remove foam and placed in a blender bowl.
Before you make butter at home (a photo of the prepared product will be presented below), you need to let the skimmed cream stand at room temperature. This will greatly facilitate the whipping process. To make the butter more tender and airy, you first need to beat it at low speed, gradually increasing the speed. Noticing that whitish moisture with flakes began to separate from the main mass, you can turn off the device and drain the liquid that has appeared into a separate bowl. Buttermilk can later be used to make pie dough.
Those who do not know how to make butter at home from goat's milk can be recommended to follow the above scheme. In this case, the technological process is completely identical to obtaining butter from cow's milk.

Another quick way
Before you make butter at home from cream, you need to hold them for about ten hours at room temperature. During this time, they will have time to warm up well and evenly. It is advisable to purchase thick and very thick. It is from them that the most delicious oil is obtained.
The jar of warm cream should be shaken vigorously for four or five minutes. After they get together, you need to drain the buttermilk and rinse the resulting oil.

How to give the finished product the desired shape?
Having figured out how to make butter at home, you should think about how to form a beautiful smooth piece out of it. This can be done using a regular deep plate. Its size should be sufficient so that the piece can roll freely on its surface. To knock out excess liquid from the product and make it smoother, you need to slightly toss and roll it on a plate. After some time, you should get an oval-shaped piece of butter.

Secrets of making homemade ghee
It is believed that this product brings invaluable benefits to the human body. In the process of melting, excess water, milk components and other impurities are removed from it. Now you know how to make butter at home, therefore, this fresh and healthy product will always be in your refrigerator. For melting, we need a kilogram of butter, previously cut into arbitrary pieces. Putting the product in a dish with a thick bottom, place it on the stove and heat over low heat. During the heating process, foam will begin to appear on the surface.
The oil should simmer over low heat for at least half an hour. During this time, you need to periodically mix it. Otherwise, the resulting sediment may stick to the bottom of the pan. Closer to the end of the cooking process, carefully remove the foam. The resulting product, which has a pleasant golden hue, must be filtered through several layers of clean gauze and poured into a ceramic dish with a lid. After waiting for the product to cool completely, it can be sent for storage in the refrigerator.
Original sandwich butter recipe
To prepare this snack, you will need one hundred grams of homemade butter, two tablespoons of sun-dried tomatoes and four tablespoons of pre-grated parmesan. Place all ingredients in the bowl of a food processor and grind them. You can add a few basil leaves to the mixture if you like. The resulting sandwich oil is wrapped in paper or foil and sent for storage in the refrigerator.
Butter is a product of mass demand. Everyone buys it, always and everywhere, except that now, due to leaked provocative information about the composition of store-bought oil, people are more careful in the process of choosing this product. However, bad news for large producers can be good news for entrepreneurs who want to start their own small home butter business. Of course, starting such a business is easier if you live in a rural area, however, a city dweller can open his own small business by finding bona fide suppliers from nearby villages. Of course, such a product will cost twice as much as a store-bought one, but the standard of living is growing, and the demand for homemade oil remains steadily high. What's more, although you will have to regularly purchase raw materials, the cost of the necessary equipment is low and can be easily used at home.
Required Ingredients
Butter can be obtained from milk (a separator is used to obtain cream) or from ready-made cream. When it comes to making butter just for yourself or for your family, it is the second method that is beneficial, because buying ready-made cream on the market is easier and cheaper than buying a separator. But even in this case, it is worth paying attention to their density. However, this option is not suitable for business - it is unlikely that you will find a person or even people who will supply liters of finished and 100% high-quality product for you every day.
Therefore, entrepreneurs who plan to establish butter production need to regularly purchase milk. Even if you yourself live in a rural area and have cows, it is unlikely that they will be able to produce 100 liters per day, and from this volume about 10 liters of cream are obtained, which, in turn, turn into about 5 kg of butter (these calculations approximate, since the amount of cream obtained will depend on the fat content of the milk, which, in turn, will depend on the season, period, the cow itself). Therefore, you still have to buy products from fellow villagers. Remember, neither a high-quality separator, nor the most modern butter churn can compensate for the shortcomings of raw materials, which means that you need to find people who will sell you really tasty, full-fat milk. If you live in a city, try to find suppliers in the nearest villages - this is where you can buy high-quality and inexpensive raw materials (if these same people take the goods to the market and you buy milk there, the price will be much higher).
Milk is necessary for the production of "classic" butter. However, you can also use original recipes. Housewives add peanuts, chocolate, herbs, peppers and even cranberries to the oil. However, it is unlikely that such oils will diverge massively, which means that you can add ordinary and a little chocolate butter and, possibly, a little “experimental” product to your assortment. After that, it will be possible to track the dynamics of demand.
Necessary equipment
To make butter at home you will need:
- Separator. It is he who is used to obtain cream from milk. Such equipment costs from 3.5 thousand rubles. The home separator does not take up much space (usually its size is about one and a half times larger than the size of a conventional food processor or slow cooker) and is easy to use.
- Containers for milk and cream. To collect the cream that is produced by the separator, ordinary plastic kitchen containers are best (they can also be used to cool the butter), while processed milk (skip) needs large containers, such as buckets or basins.
- Home butter churn. Butter can also be whipped by hand, without any equipment, but this is too labor-intensive for large production volumes. That is why entrepreneurs need to purchase a churn, which are manual and mechanical. Of course, it is mechanical equipment that needs to be purchased, the only drawback of which is that it depends on the mains. The main advantages are the speed of the process, shock resistance, protection from vibrations. In addition, they are quickly disassembled, and the parts are easy to clean. The prices for such machines are different, but the simplest (but at the same time effective) of them can be purchased for 5 thousand rubles. When choosing a butter churn, pay attention to its capacity.
- Vacuum sealer for the home. As you know, oil easily absorbs odors, and this can be avoided by properly packaging products. Vacuum sealers are inexpensive (from 4 thousand rubles) and easy to use. Oil in sealed packaging can be stored even in a refrigerator filled with food.
- Packaging bags, containers, spoons, knives.
Step by step production technology
In general, the whole process of butter production at home can be divided into two stages: obtaining cream from milk using a separator and whipping cream in a butter mill. Below you can find detailed step-by-step instructions for each of them.
Stage 1. Getting cream from milk
Assemble the separator. This is done according to the instructions. Set the cream fat to the correct level (the amount of fat should not exceed 35%).
Prepare two containers, a smaller one for the cream and a large one for the skim milk.
Pour milk into a special basin on the separator (can be found in the instructions).

Keep an eye on the cream and skim containers, if one of them is full, replace it.

Leave the resulting cream to cool in the refrigerator (they should thicken at least to the state of thick sour cream before whipping). Obrat will produce about 10 times more than cream, and this product can also be used to generate additional profit, for example, you can make cottage cheese.

Important! Cream pasteurization will get rid of any harmful bacteria, neutralize the "cow" smell and increase the shelf life of the final product. The heating temperature of the cream will depend on the type of butter, so to obtain sweet cream butter they are pasteurized at 85-87 ° C, and for sour cream - at 90-92 ° C. Remember, you can not bring the cream to a boil. If you decide to pasteurize the product, do so after receiving them, and only then refrigerate.
Stage 2. Production of butter from cream
Cream is poured into a special capacity of the churn. The drum begins to spin, whipping the cream and separating the buttermilk. If the churn has an outlet for buttermilk, substitute a special container, if not, you can separate the butter manually.

Remove the resulting dense lump of oil. If it does not form (which can also happen for a number of reasons), you can whip the cream yourself. Using a mortar, or by hand, as shown in the picture, you need to carefully squeeze the butter from the buttermilk, manually or with gauze. There can also be a buyer for buttermilk or you can use it in your kitchen - they make excellent pastries with it, just drink it (it has many useful properties).

Rinse the oil in cold water, then pack it into molds. Leave to cool in the freezer.

As mentioned earlier, the oil easily absorbs any odors. To avoid this, you can pack the bars with a home vacuum sealer. The oil is stored at a temperature of +2 to +5 degrees Celsius.

Sales directions
So, you understood the technology for the production of butter at home, calculated the costs and possible profits. But where to sell such products?
- Acquaintances and friends. Don't underestimate the effectiveness of word of mouth. Offer to try the first batch of relatives, friends, acquaintances. The first small bars can even be given for free. If your butter is really tasty, you can be sure they will return as regular customers and bring their friends with them.
- Markets. This is perhaps the most obvious answer to this question. Such products are most often presented in the markets. It should also be mentioned that there you can sell not only butter, but also, for example, cottage cheese from skimmed milk.
- Your store. There is no need to describe the advantages of such a place for selling homemade butter.
- Restaurants and cafes of the middle and higher class. Offer your products for sampling in establishments where the owners and chefs are really interested in the quality and taste of their dishes. Perhaps one of them will become your regular customer.
Conclusion
Of course, the production of butter at home requires certain investments, the constant purchase of raw materials, which, however, cannot be compared with investments in any other business. Of course, it is worth starting small, gradually expanding the client base and production volumes. But at the same time, the process of making this tasty and natural product is not very complicated, but it promises a good, constant profit. If you are interested in this home business, it is already an indication that you should try your hand at this field.
Related Articles